Todays MailerLite tutorial is on creating and embedding forms to gain subscribers. Using email marketing is the best way to build your online business and connect with your readers.
I suggest that you create a form for every opt-in offer and embed them in relevant blog posts. But don’t worry! I’ll show you how.
This post was originally published May 29th, 2018 and has been updated to be current with new information. This post may contain affiliate links. If you click a link and make a purchase, I may receive a commission at no extra cost to you. Full disclosure is here.
Welcome to Fearless Affiliate.
My name is Irma and I help new bloggers to learn the ropes. There is a lot to take in that first year of blogging, from choosing a niche to changing your mindset from worker bee mentality to that of successful entrepreneur.
I like to focus on practical information and positive thinking, so if that sounds good to you please sign up for my weekly newsletter of tips and free stuff for bloggers. In return you will get the password to my resource library of PDF printables for bloggers like my Google Analytics Cheatsheet or my SEO Checklist.#win-win
What Is An Embedded Form?
Embedded forms, in the email marketing world, are the opt-in boxes that invite you to subscribe to a websites newsletter.
The purpose of your newsletter is to create a relationship between yourself and the subscriber. People interested in your content are invited to sign up for your newsletter in exchange for a free gift aka freebie.
This is one part of your email marketing.
The definition of marketing is: (noun) “the action or business of promoting and selling products or services, including market research and advertising”.
Marketing is required if you want to make money online.
The other part of your marketing is creating automations.
Related Post: Achieve Your Blogging Goals With MailerLite Automation
The good news is that you don’t have to be pushy with your promotions if you do it right!
By creating opt-in forms to collect subscribers, you need only create the form once.
Then you can embed it in multiple related blog posts. After that, you only have to write your newsletter to maintain your connection.
Once you create your first form, it is simple to duplicate the process. Ideally, you create one form per freebie.
The sales funnel looks like this:
- Visitor reads blog post and decides to sign up to get more content
- They use your opt-in form and are given a free PDF/coupon code/other benefit in exchange for their email address
- You keep them up-to-date with your newsletter of exclusive content, relevant product links, and deals
It’s quite passive. Set it up once and then maintain it by writing your weekly newsletter.

The Benefits of Email Marketing
Many 6- and 7-figure bloggers will say that they regret waiting to set up email marketing, including Melyssa Griffin.

The first part of this process is getting set up with an Email Service Provider (ESP).
- Free options include MailerLite (recommended) and MailChimp.
- Paid options include ConvertKit, MadMimi, Drip, Aweber and others.
Related Post: How To Use MailerLite
I recommend MailerLite because it is free for your first 1,000 subscribers and very affordable after that. By the time you get your first 1K subscribers, you can afford any of the paid options.
Benefits of having a newsletter option for your visitors:
- It ensures that people will return to your website over and over, if you link to your blog posts from your newsletter.
- Subscribers are visitors who are actively interested in what you have to say. You don’t have to guess whether you are connecting with them.
- You can reward subscribers for subscribing by giving them exclusive and previously unpublished content.
- It’s easier to niche-down your website, because you will know exactly why people have subscribed and what they are interested in
Being able to niche-down is helpful if your niche is broad with a variety of topics. To further niche-down:
- You can send surveys to your list asking them what they want more of, content-wise.
- Having an email ensures that you will be generating traffic to your site. More traffic = better ranking. Better ranking = more traffic!
More traffic from your site tells Google that you have something of interest to say to the world.
Then Google moves you up the rankings to help you to say it.
- Visitors get more targeted help from you, now that you know what they’re interested in.
- Loyal subscribers will happily beta-test your courses or products and they will buy them as well (= sales).
This is not just a bonus for you, but also for your visitors. They are looking for your answers to their questions and when you create more comprehensive help (courses), they want to sign up.
And hopefully get more awesome insight from you, so let them!
I tried list building when I was in my second month of blogging…
But I was so unsure of myself then, and I was always second guessing what I was doing.
Everything was so confusing because MailChimp was difficult to use. It might be different now, but I didn’t stick around to find out.
New bloggers seem afraid of email marketing because it seems daunting.
But like so many things we need to learn to make money online, it is totally worth it.
Once you get the basics down you can start tweaking the system to improve your skills and keep increasing your traffic. You got this!
MailerLite Email Opt-In Forms Tutorial
MailerLite is user-friendly and helpful. It is free for up to 1000 subscribers and has all the bells and whistles that some of the more expensive competition offers. And at a more reasonable price…free.
I have signed up for multiple list building courses in the past few months years, and I have learned a couple of things that I want you to know.
One of them is: the sooner you get your basic sales funnel set up, the better.
There is no benefit to waiting. And your people are missing out on all that you could be sharing with them.
The second thing is: promote, promote, promote.
So when you create the opt-in form, you have to promote it.
We will get to that in a bit.
Putting opt-in forms on your site is an invitation for people to connect with you. And really, you gotta start sometime right?
So let’s embed some forms and put this aspect of blogging into the “been there, done that” folder. Then you can move past this intimidating part of blogging, because it is really not that scary after all.
This tutorial is based on using WordPress, so if you do not use this content management system (CMS), you will have to check your CMS help files.
1. Open your MailerLite dashboard and from the menu in the upper left, choose FORMS.
On the next page click the big orange button to start creating a form. If you have not signed up yet, follow one of my blue highlighted links.
Signup is quick and painless! All you need is a branded email address.
This is the one that comes from your hosting and is directly linked to your website.
For example, mine is “support@fearlessaffiliate.com”. I then forward my mail from here to a gmail account.
ESP’s want these legitimate email addresses to counter-act the spammers who use generic email like hotmail and gmail.


You will want to choose Embedded form so that you can get the html code to add to your website in various places.
You can also get the Official MailerLite Sign Up Forms plugin for WordPress which makes adding forms to posts or pages super easy.
Give your form a name. This is for your benefit only and to help you differentiate from all the other forms you will create. Save and continue.
2. Add Your Email Subscribers
If you are brand new to email marketing, you probably have none and you can create a group based on your website URL (default option).
If you have some from another email service provider, you can import them into MailerLite. This video shows how to import MailChimp subscribers, but the idea is the same for any other ESP.
Save and continue.
3. Design Your Embedded Form
MailerLite updated all of their forms to be GDPR compliant.
On this page, you have two options. Subscribe form and thank you message. It defaults to the subscribe form for me, so adjust accordingly.
In the design tab, you have the option to change the style of form.

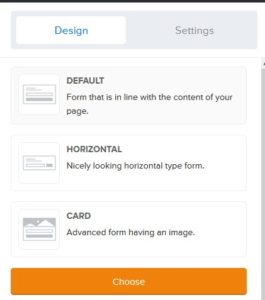
Your three choices are DEFAULT, HORIZONTAL, and CARD. It’s all personal preference, so choose DEFAULT for now.
Click on the form image in the large window to access sub-menus. In here, you can add a field to the form such as NAME.
By default you must have “Email” In the FORM DESIGN area.
Otherwise how would you know where to send your newsletter? It’s best to ask for the subscribers first name, as well, to create more personalized newsletters.
You just have to click on any of the elements to change elements to create completely unique forms for your website.
Clicking on FORM in the design settings allows you to change the size (height, width) and add a contrasting border.
You can make tall skinny forms for your sidebar or wide and narrow forms to fit in between paragraphs in your blog posts.
- Form background is exactly that. Change it from grey to your brand colors.
- Title is the main heading for your form. Change it from NEWSLETTER to something befitting to your brand.
- Text is the text under your Title.
*Due to GDPR regulations, do not make signing up mandatory to receive free stuff or anything else. FYI: MailerLite has all the subscribers personal info and can help you to delete it if a subscriber requests it.
Word your text so that the people signing up know exactly what they are signing up for (weekly newsletter). Then note that they will receive a thank you gift after they sign up.
Note: you do NOT have to offer freebies.
Right now just work on getting the opt-in form on your site. You can do more advanced marketing later on.
- Input is the color of the field box (Name, Email etc)
- Button is the button color and text
- Page background changes the whole area around your opt-in box to whatever color you choose.
I do not bother with this one for forms being embedded on my site because I am taking the html code and adding it to a text widget or else just pasting it into my text editor in wordpress.
In the Settings tab, you can choose to have checkboxes added to your form (for GDRP compliance) or to hide segmentation fields.
Let your form reflect you and your personality.
Attract the people who really want to sign up for all of your 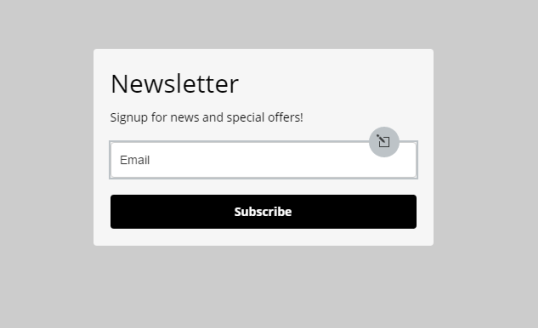

Do not be afraid to change “sign up to our newsletter” into “have I got some info for you!” or whatever you want to say.
People like individuality, so go for it!
Just click the pencil icon to edit that area of the form.
Change the buttons as well. I have seen some crazy stuff on buttons, as I am sure that you have as well, so go for it (within reason of course).
You can read up on color psychology to add intensity to your button color choices.
4. Create your “thank you” message.
Click up top on SUCCESS MESSAGE, and then click on the form that is displayed (click the pencil icon) to bring up a Content area that you can edit.
You can also add photos here as well or embed other html into the form. And you can add a link to a PDF, like a freebie, from the thank you message.
When you are happy with how your form looks, choose the big orange DONE EDITING button in the top right hand corner.
5. Choose whether you want double opt-in or not.
There are different schools of thought for this choice.
- Single opt-in is easier for subscribers, since they get less “hassle” about signing up (one less thing to click).
- Double opt-in makes sure that they really want to sign up.
I think this is unnecessary if you have an unsubscribe option in your newsletters. You still get to send a thank you message either way.
You can research this for yourself and decide On or Off for the toggle switch. Your choice.
Scroll down, on this same page, to “Embed form in your website”.
I chose java script, but if that does not work for you try the html and copy and paste it into your sidebar text widget or into the text editor in WordPress.
Place Your Embedded Forms In Multiple Locations
FYI: Using the MailerLite plugin for WordPress means you can grab the Java code snippet and paste it anywhere in your blog post/page, using the TEXT editor.
When you switch back to visual and save, you can refresh your page to see your form.
I recommend that you place your form near the top of your content (above the fold) and near the bottom. I also recommend creating a nice sidebar form.
Encourage people multiple times, on one page, to sign up. It works!
If you have the kind of theme that allows you to put an embedded form into the header, then do that. It’s a perfect spot.
The next best spot is at the top of your sidebar…in a really obvious spot.
Visitors are not used to your site the way that you are, so help them out by making your opt-in really stand out for them.
You want it to be as front and center as it can be (above the fold). Obvious is the key word here.
People want to sign up. They really do.
It is important to give visitors a hand with this, so be blatantly obvious about the placement. Put it somewhere that visitors will trip over, so to speak.
As well, use a horizontal form to run across the lower area of your main page and/or all of your posts. Don’t be shy 🙂
You will be amazed at how quickly the signups will happen.
And they will keep happening, as long as you make it easy for people.
A side note: you can create your forms in different colors (use the duplicate option) to match your blog post images or replace one (or two) of them.
Get creative! If you have a form in the sidebar, one in the middle of a post and one at the footer of your site, a visitor should not be able to miss the message.
6. Segmenting your list
This is totally optional, but helpful if you have a blog with more than one “niche”, such as a DIY crafts/recipes/mom blog, for example.
This way you can be sure to send craft ideas to the people who are interested in that information, and recipes to the people who are interested in food ideas, and mom stuff to the moms.
Here is a quick video on creating segments with MailerLite:

7. Create Groups
Groups are different from segments and can help you track which forms are the most popular on your site. If, for example, if you are creating freebies for your blog posts and then creating an opt-in form to promote the freebie.
This helps to identify what people are most interested in when they come to your site.
For example, if you have an opt-in form for chicken recipes and an opt-in form for beef recipes.
Whoever signs up to either of these forms would still belong to the “recipes” segment, but now you can see if chicken recipes are more popular than beef recipes, and publish blog posts accordingly.
Creating forms in MailerLite is super simple.

The most time consuming part of this task is designing the form to look.just.right.
You can also duplicate the form from the main FORMS page.
Then just change a thing or two to A/B split test and see what your visitors respond to.
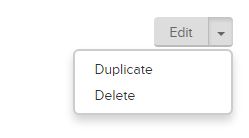
To duplicate your form, from the main menu choose Forms > Embedded forms.
Find your form in the list (if there is more than one form) .
At the far right of the form is an Edit button with a down arrow. Here you can choose Duplicate or Delete.
Conclusion
Like everything else about blogging, it is all trial and error. Best to get on top of it now and start collecting valuable data!
Related Post: Relationship Marketing with Email
Are you a subscriber yet? Sign up for my weekly newsletter of blogging how-to tips and get the password to my Resource Library of PDF printables like my super popular Copywriting Checklist.
Allright then! Do you have any questions about this process? Did I miss anything? Do you have any insights on setting up an email service? Tell me in the comments – I love hearing from you 🙂
Until then, happy blogging! And follow me on Pinterest.
-Irma 🙂