Welcome to this simple branding tutorial, using free Canva! Canva is a free design editing tool, much like Photoshop, but easy to use for beginners.
Use it to make blog graphics, pins for Pinterest, and freebies for your opt-in box. From the main dashboard you can see many of the templates available. I love Canva, and so will you after this.
This post was originally published February 13th, 2018 and has been updated to be current with new information. This post may contain affiliate links. If you click a link and make a purchase, I may receive a commission at no extra cost to you. Full disclosure is here.
Welcome to Fearless Affiliate.
My name is Irma and I help new bloggers to learn the ropes. There is a lot to take in that first year of blogging, from choosing a niche to changing your mindset from worker bee mentality to that of successful entrepreneur.
I like to focus on practical information and positive thinking, so if that sounds good to you please sign up for my weekly newsletter of tips and free stuff for bloggers.
Subscribers will get the password to my resource library of PDF printables for bloggers like my Google Analytics Cheatsheet or my SEO Checklist.#win-win
Still haven’t picked a blog niche?
I can help with that too! Read my 5 Secrets To Finding Your Niche eReport…it’s in the Resource Library. Sign up now and check it out.
Sign Up For Canva
You can sign up for free Canva here.
Choose the small business option. Just click through until you get to the tutorial, which takes about a minute. You can do the tutorials now or wait until you are ready to create so it is fresh in your mind.
Note: I have updated the graphics in this post to screenshots of Canva 2.0, the current version.
A super handy addition to the main dashboard is a search bar.
Click inside the box and scroll down to see all the design options from the main menu in list form. You can also find your custom designs in here once you have given them a name.
What Can Canva Do?
I was not on top of website branding when I first started. In fact, until I bought a course on another subject, I had never even considered branding.
I had seen many aspects of branding, such as websites where all the pages looked visually similar or things like favicons (short for favorite icon). I put off learning branding to instead work on SEO and my blog content.
However, you can take a week out of researching other stuff to start creating a brand for yourself.
It is likely that your brand will evolve over time, as you see what works for you are your visitors, and what does not.
Getting started with branding in the early stages of your blog is helpful, so that it is not overwhelming later.
Why do I need a brand?
Good question! And the best reason is that once you have created a brand, you can use it to change all of your social media accounts and future posts to match, so that when visitors go from Facebook or Twitter to your website, they will know they are in the right place because it looks the same.
Branding gives you consistency! Branding creates a more fluid experience for visitors, and anything that will keep them on your site looking around is a good thing!
Your brand is YOU. Let visitors know they are in the right place. Create a look that says “Yes, you are in the right place. Stay a while and let me share how I can help you!”.
To start branding with Canva, ask yourself a few key questions. What we will work on is your vision, your colors and fonts, and your logo.
1. Your Vision
Ask yourself some questions:
- What is your blog niche, but more importantly, WHAT is its focus?
- When you drill down, WHY are you doing a blog in this niche?
- What is it you hope to accomplish with your blog?
- If you want to help people, WHO?
Is your target audience men or women? Does Google Analytics confirm this? Is this really your demographic? Or do you hope to capture a different demographic than those who currently visit your site?
- HOW old are these people? Why would they want your information?
- WHERE do they live?
- WHEN people visit your site, what do they see? Is it organized? Do the topics that you post represent your niche?
- What can you do for the people who visit your site? How are your blog posts going to help them?
Once you answer these questions, you will have a bit better of an idea of what YOU are doing. You want to be able to incorporate your vision of your website into your branding.
Next, choose a photo of yourself.
One that you want on all of your branding. Just one.
Or you can use a logo in place of a photo, but people generally like to have a look at the person who is writing these posts, so they can develop their relationship with you. We do not have relationships with logos.
Choose a nice headshot (no selfies!!) and hopefully you are smiling!
2. Your colors and fonts.
So, you may already have some nice colors in your website theme. If you like them, then find the hex code for the main color, and at least one other complimentary color.
You can look up hex codes here.
Just upload a photo or part of your header image and it will pick the colors out and give you hex codes. I would suggest choosing 3 to 5 colors.
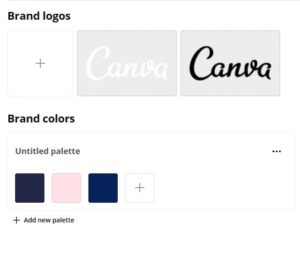
Add the top three color choices to your Canva by choosing, from the dashboard and the left side menu, YOUR BRAND.
Free Canva will only allow 3 choices. If you later decide to pay for Canva for Work, you will get more slots.
You can change these choices later if you decide to by x-ing the choice out to open a spot to add another.
Next, you want to choose some fonts.
Canva offers up a nice selection of font pairings or you can use the ones that you like.
You want to have 3 to 5 of these as well. I would choose 2 or 3 that are basic serif (easy to read) or sans serif (also easy to read), like Times New Roman or Monsterrat.
These are easy to read regardless of whether you are using all caps, all lowercase or a combination.
You also want 2 complimentary fonts, perhaps a script or another font that represents your brand. Once you start playing around with Canva and are testing your fonts, it will be easier to choose.
I do recommend choosing fonts that have the ability to use the BOLD option, so that your text will pop.
When you choose the TEXT tab from the left menu, Canva will show you examples of font pairings that you can add to your designs (see red arrow). You can click the font pair and add it straight into your design.
If you are going to use Canva to create your logo, you are limited to the fonts that Canva uses, which are still many (yay!), but not all. Canva has a lot of fun fonts, like Black Ops.
If you sign up for Canva for Work (paid) you get the option to upload fonts.
You can get free fonts every week when you sign up to my weekly newsletter.
Keep a notebook handy to write your colors and fonts in so you can find it when you are creating. If you use the paid version of Canva – “Canva for Work” – it will save your branding stuff, but the free version does not.
Canva Hack: Make a design that you like with the brand colors and fonts that you like. Save it and it will be in your ALL YOUR DESIGNS area. Click on it and choose “make a copy” from your save menu.
This allows you to reuse the design over and over, changing colors, photos, or what the text says. This make creating images super quick.
3. Your Logo
Depending on the type of theme that you have or what your home page looks like, you can make yourself a logo for it.
You can create a logo in Canva and blend it into your header photo. Or you can make whatever you want. Be aware that there may be size limitations for your theme.
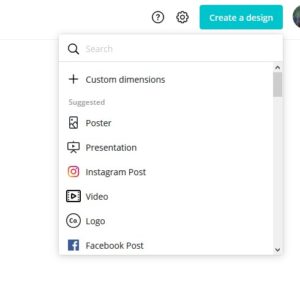
Log in to Canva, and click on CREATE A DESIGN. This gives you a search option as well as + CUSTOM DIMENSIONS.
The size should be 360 x 115 pixels (or it was for my theme), and then click CREATE A NEW DESIGN. You can adjust this later if you need a larger or smaller size.
Click on BACKGROUND
You can choose colors by clicking the multi-colored icon at the top left of the design area. It will open a side window with your branding options.
Next, choose a TEXT option
It does not matter which text choice you choose, because you can change the font, font size and color of the text once you get started. Go ahead and write in your website name, your name or whatever you want.
When you click in your text box
A new menu appears above your design. From here you can change fonts, font size, font colors, spacing between letters, spacing between lines, and other options like bold or italics. You can also add a link to your font.
You can move the font around by finding an edge (broken line) and when the four-headed arrow pops up, you can move it. There is also a little handle that pops out from the bottom; grab it and hold while you move it around so that you can rotate items.
If you want to divide your text with a photo of yourself, you can choose a frame from ELEMENTS.
Just center the frame where you want it and then drag your photo (from uploads) or a stock image from the ELEMENTS tab. There is a huge variety of anything you need for your design, but be aware that some choices are paid. It is still pretty cheap tho.
When you click your background color, a checkerboard kinda thingy will appear in the upper right next to the “link” icon.
This is a transparency button.
Click it to be able to make items more transparent, like your favicon (see below). This also works well for Pinterest pins when you want to overlay a box over a photo to make your text pop.
Thousands of Free Stock Photos
Canva is a very versatile program and comes with thousands of free and paid ($1) stock photos.
Once you get the hang of it you will be using it all the time to create blog graphics that really represent your posts.
Save your favorite designs
One tip that I just found, is that when you create something that you really like and may use again, create a copy and give it a name that you can find again like LOGO TEMPLATE.
To create a copy, make sure that you have saved it (FILE > SAVE). Then click FILE > MAKE A COPY.
Your copy will open in a new window, and you can go ahead and edit it, while still maintaining the original. This is super handy if you want to try a few different logos, or if you are creating a brand template for pins on Pinterest.
If you are doing A/B testing with your email newsletter, you can easily create graphics that represent different aspects of your vision and then test to see which one your subscribers respond to the most.
This also applies to creating pins for Pinterest.
4. Your Favicon
You can also create a simple favicon (the icon that you see in browser tabs = favorite icon = favicon). You can buy a logo from many design shops for a reasonable price, or create your own.
In Canva, choose LOGO and create away.
You want a square that is at least 500 x 500 pixels to look nice in a browser tab.
Use the ELEMENTS tab to find hollow shapes (which can have a transparent background like mine), or use a block of color with a complimentary colored text (like the Starbucks favicon).
You will probably have to create a few and try them out to see how they look.
I was able to add mine to my website from within the APPEARANCE > CUSTOMIZE within WordPress. Look around for the option in your theme editor to add this image.
5. Creating Pinterest Pins
You can easily create one pin for Pinterest as a template, and then create multiple copies. Just switch photos and prominent brand colors for endless variations.
As well, do a search for “free Canva pinterest pin templates”…there are lot’s out there.
Many designers are creating templates for everything on Canva, and pins are no exception.
The templates are a clickable link. When you click it, it will load the templates into the appropriate area of Canva; all you have to do is edit and save.
Using free templates makes it easy to create the new, daily pins that Pinterest wants from content creators.
You can increase monthly views, and by extension blog traffic, by following the Pinterest guidelines.
That means uploading a new pin instead of using older, established pins. Reusing your templates means that you can create 5 new pins in a matter of minutes.
Upload your pins into the native Pinterest scheduler and let Pinterest add them to your feed. Easy-peasy!
FYI: You can create new pins that go to old posts. If you have a post that brings traffic, create new pins regularly and keep fishing for new readers/customers.
Conclusion
As you can see, branding with Canva is fairly easy, as is making pins.
It may not be as ‘pro’ as you might like, yet, but this whole process can help you to really create your vision.
As you get better at using Canva, you will start to create some really awesome graphics to put on your website. Blog banners, call-to-action buttons, or anything that lets you express yourself and your “brand”.
That is the thing about niche websites…you really want to stand out and be different. You want the world to see you as unique, while you are offering information that others do not. Branding your website will help you, and help your visitors find you across social media.
Speaking of niches, have you chosen yours? Get my free report as a gift for subscribing to the Fearless Affiliate newsletter, as well as exclusive content delivered weekly.
Do you have a brand? How did you put together the elements? Are you happy with the results and has it helped to increase your traffic? Please leave your answers and comments in the box below!
Cheers and happy blogging! And follow me on Pinterest!
-Irma
Thank you for sharing some good stuff on Canva. I’ve been using it for a few months but you still taught me a lot I didn’t know!
You are welcome and thank you for visiting us today Maggie!
Cheers,
-Irma 🙂
I love Canva! I have the business account but haven’t fully utilized all of the branding features that come with it
Hi Tori and thank you for visiting us today!
Canva is amazing and I recommend this awesome program to everyone who will listen 🙂
Cheers,
-Irma 🙂
Great article and explanation on Canva and branding in general. I’ve been using Canva for a few months and I still learned something new from you!
I am happy to help Tina. Thank you for visiting us today!
Cheers,
-Irma 🙂
That is a lot of great information! I lot I didn’t know and wish I had read this before all the hours I put in to creating my own brand.
Hi Lori and thank you for visiting us today!
I hear that! I wish that I had learned about branding a lot sooner. Canva is an awesome tool though isn’t it?
Cheers,
-Irma 🙂
I love Canva and am always learning about it.
Great article! Thank you for sharing ?
You are welcome Lori and thank you for visiting us today!
Cheers,
-Irma 🙂
Hello, my friend and thanks for sharing. I am sure the information that you have provided will go a looking way in helping persons to create their brand and to have success online.
Thank you Norman and thank you for visiting today!
Cheers,
-Irma 🙂
I’ve use Canva a few times before to create banners and emblems, some of which are great for FREE use.
You outlined some more features which I didn’t even realise were available like grids and illustrations. I’ll have to check it out again!
Thanks Irma:)
Hi Jeremy and thank you for visiting us today,
I know, it’s great isn’t it? These basic instructions will allow you make some really fun items for a website.
Cheers,
-Irma 🙂
Thank you for the information. I use Canva myself and it a great canvas to do your designs on. It helped me make some of my ads look remarkable.
Thank you for stopping by today Ronnie!
I heard people talk about it this Canva program, and I admit that I watched a lot of videos on how to use the program before I started creating anything I was even a little proud of. Now I use it daily, so I am happy to share some of what I have learned.
Cheers,
-Irma 🙂