


In today’s post, we are going to set up an auto-responder, as well as create a list to put your subscribers in and write our first newsletter to send to them. And we will create the “Sign Up” form for our website.
This is our email marketing campaign!

An auto-responder is a bit of script that allows you to start an email subscriber list and send your subscribers a newsletter or periodic updates about content from your site, automatically. If you have hundreds of subscribers, it would be daunting to email each person individually, so you want an auto-responder to do this work for you!
There are many autoresponders out there, for all different price points. Examples are Aweber, MailChimp, and iShoppingCart, and they all have their own benefits depending on what you are promoting on your website.
In this post, I am going to walk you through setting up MailChimp, because it is free for up to 2000 subscribers, with their “forever free” plan. Be advised that this free plan does not come with any kind of support; however there are plenty of free tutorials available online to help you tweak it.


First thing is first. Go to your WordPress back office and find the plugin “MailChimp List Subscribe Form”. Go ahead and install it, and then minimize this window. We will come back to this later. Now go sign up for a free account at mailchimp.com. Jump through the hoops. I will wait right here.
The first thing that we will do is create a list for our subscribers. Go up to the top menu and choose LIST, and then CREATE LIST. Fill in the details. “From” email is your contact email, so likely your website email. “From” name is the name that the recipient will see when they receive the message, so use your name/business name here. Also choose how often you want updates on activity.
NOTE: You will see your home address below this, that you used it when signing up. You can edit this information, since it will be on your newsletter, and if you do not want recipients to know your home address, consider getting a PO Box. It is MANDATORY, according to Anti-Spam laws, to have this information in your form, so you must have some kind of address here.
Save and move on to the next task. You can click the mailchimp monkey icon in the top left corner to take you back to the main menu. Then choose LISTS again, and there is your list, waiting to be populated by your new subscribers.
Now, click on your list. This will give you access to the campaign area. It is empty because YOU HAVE NO CONTACTS (we will fix this soon), so then choose CREATE SIGNUP FORM. You get some choices in the type of form that you can create, but for simplicity, we will choose GENERAL FORMS. The other forms are for different types of campaigns, like giving away freebies. I will elaborate on that in another lesson.

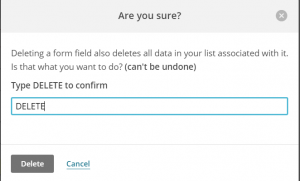
Where it says “Forms and response emails” make sure that it says SIGNUP FORM. You can scroll down to the form and customize it, but I would follow the advice of others and remove the LAST NAME field as it is unnecessary, and the less you ask for from visitors, the easier you make it for them to sign up. Click on the last name field box and choose the minus sign, and then type DELETE into the box to delete!
Now, click the tab named DESIGN IT, and customize away! You can change the background colors to match your website theme. Just click anywhere in the boxes to bring up the color choices or other available options.
You can also add your custom logo to your header. Go back to the very top menu and choose LIST again. You will see the list that you just created, and it has an “Add Subscriber” radio button; click this and add your personal email so we can test later.

Now go to the menu at the top of the page and click CAMPAIGNS > CREATE CAMPAIGN. Choose CREATE AN EMAIL. You get four choices here, but for this lesson choose REGULAR, and then give your campaign a name. I called mine “Welcome Newsletter”, but you can call it whatever you want, and you can go back and edit this after you check your test newsletter. Then click BEGIN. Next choose ENTIRE LIST, which should be (1 subscriber).
Fill in the fields. You have already chosen WELCOME NEWSLETTER for a campaign name. Email subject can be anything from “Howdy! Way to go signing up!” to “Welcome to my newsletter”. Do not worry too much about these settings right now. When you send yourself some test emails, you can edit all of this and see how it looks in the real world.
Do check PERSONALIZE THE “TO” FIELD (*|FNAME|*), to give your newsletter a personal touch by having the newsletter use your subscribers first name. If you have Google Analytics, you can go ahead and add this info or skip until later. Click next.

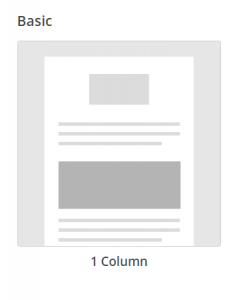
On this page you get to choose your layout template, but for now, choose the BASIC 1-COLUMN and click it.
Fun time!!! Go ahead and add your logo or a nice photo to the top of the email. Just click inside any box and edit away. There are lots of choices; add Social Share buttons, or Social Follow. If you have a store, you can add a “BUY NOW” button. Add video, photos, dividers etc. etc.
You will not be able to see your home address on this page, but it is there below the email box and you will see it in the final product. When you are finished editing, click next. Do not worry about your email being perfect because on the last page you can send your test email out to yourself and see what you like and don’t like before you finalize.
At the very top right, click the down arrow at PREVIEW AND TEST and choose the second option SEND A TEST EMAIL. Go ahead and send an email to yourself, then go have a look at it. You can send yourself a reply from the email, perhaps reminding yourself of things that need editing, and you can see the replies back at the MailChimp site.
When you are finished editing, you can click the NEXT button. Be aware! There is no editing after you choose this last NEXT button. Once your campaign has been sent, it has already been sent to their servers. And you can only edit the URL of a sent campaign 2 times, so be sure that you have finalized everything to your liking. If you need to get back to the main menu from this point, click on the MailChimp logo in the upper left corner.
Do not close out the MailChimp website, as we need an API key for the settings in wordpress.
Go to your wordpress back office and set up MailChimp on your website. Activate MailChimp and follow the instructions. You will require an API key, which you get from the MailChimp site; go to your name and click the down arrow. Choose PROFILE > EXTRAS and click the down arrow for API Keys. Click CREATE A KEY, and copy that key into the settings at WordPress. Do not forget to save! Each section of the settings has its own save: “UPDATE SUBSCRIBE FORM SETTINGS”.
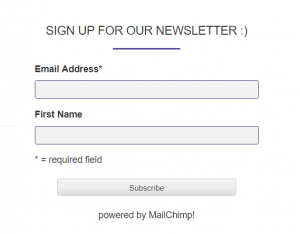
Now go to APPEARANCE > WIDGETS and look for the MailChimp widget, which will put the subscriber box on your webpage. After you add your widget, go back to your page and see how it looks. You can adjust the settings for this box back in the SETTINGS > MAILCHIMP SETTINGS. HEADER is where you can personalize the request; for example “Sign up here!”

And now for the finale; sign up to your own website using a personal email address so you can check everything. You should get an email asking if you want to subscribe to your newsletter (tee hee!) and after you confirm and subscribe you will see a SUBSCRIPTION CONFIRMED box with your home address. Yikes! Go get a PO Box!!
I found the whole process of signing up for MailChimp, and adding it to my website to be quite simple, and much less complicated that I thought at first. I will do another lesson which talks about doing a giveaway for your subscribers as soon as figure out which process to use (free PLR content vs creating my own). You can now go back to the MailChimp website and see information on your subscribers, with some analytics.
This turned into a series, so part two is How To Create A Lead Magnet, part three is Create A Quick Cheat Sheet For Your Avatar, and I will update the link to part four after it is published.
Alright, that is it for this post. If you see errors or omissions, please notify me. If you like this post or it has been helpful, please leave a comment below.