This is part four of my series of six steps to getting an email marketing campaign up and running with free tools! Yay…free is good!
Part one is How to start an email marketing campaign using MailChimp
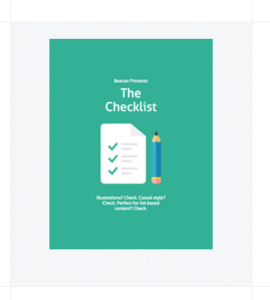
Part two is How to create a lead magnet using Beacon (free)
Part three is Create a cheat sheet for your avatar
We are going back to MailChimp! Woo Hoo. Today we will finalize attaching your lead magnet. Be sure that your lead magnet is on your desktop in .pdf form. We are going to create everything from scratch, now that you have the basics of setting up lists and creating campaigns. If you have parts of this process done and ready, use it. If not, we will be going back through the familiar steps and re-creating everything.
Log in to Mailchimp and choose LISTS > CREATE LIST. Name your list something that subscribers will see, like [your website name] Newsletter. Tell your subscriber how this came to be (You subscribed!), and choose One-by-one for the notifications, then SAVE.
On the next page, choose CREATE A SIGN UP FORM, then GENERAL FORMS. Under FORMS AND RESPONSE EMAILS, choose SIGNUP FORM. Design your form any way that you like, remembering to DELETE the last name field so that your subscribers have less to do.
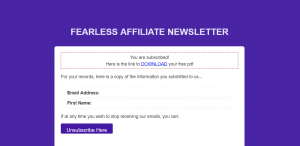
When you are happy with your form, scroll back up to FORMS AND RESPONSE EMAILS and choose FINAL WELCOME EMAIL from the drop down list. Just below that, be sure to check SEND A FINAL WELCOME EMAIL, because this is the grand prize for all your lucky subscribers! If you do not check this box, your subscribers will not get the email with the download link.
In the SUBJECT line, change it to something appropriate like “Subscription Confirmed! Here is a link to download your free pdf!” Choose the word that you want to put your link into, but for my purpose we will choose the word DOWNLOAD. Highlight this word and choose the link icon. At LINK TO choose FILE from the drop down box. Navigate to your pdf and add it, then choose insert. Check your link all the way to the end to make sure you have the right one and then choose INSERT. Then choose SAVE AND CLOSE.
If you are starting over from scratch here, go back to LISTS, find your newsletter and click the radio button to add your personal email address to your list so that you can send a test newsletter before you save and send. Once you finish, you cannot go back and edit. You must do everything before you click the SEND button!
Ok, your freebie is now ready to be sent! Next, we will create your campaign.
At the top menu, choose CAMPAIGNS. If you have campaigns in here, you can choose one or create a new one. Give it a name that is just for your reference i.e. New subscribers with a free pdf, add something nice in the subject line, check the box that says PERSONALIZE THE TO FIELD, as well as any other pertinent information and click NEXT.
Choose your template! Or make it easy on yourself and choose BASIC 1 COLUMN > NEXT. Add your logo, and write your “welcome to my newsletter” text. Design your newsletter any way you like; really go all out and make it as personal and special as you like. You have lots of choices, so be sure to give it your own personal touch.
When you are ready, click NEXT. You are now on the final page, so if anything needs editing you can still do it from here. DO NOT CLICK SEND UNLESS YOU ARE FINISHED! You cannot edit after you click send. Go ahead and send yourself a test email. You will not get the option for the freebie until after you send, because you still have to opt in. If you are happy with the way things look, click SEND. Go to your email and click through the subscription process and then download your freebie!
CONGRATULATIONS!! You did it! Now get back out there and create some more stuff!
**It is important to use the double opt-in, in order to ensure that the email address is valid, that the person actually wants to subscribe, and to keep your spam under control.
This has been a simple, inexpensive way to get started with email marketing. Yes, there are bigger and better programs with more options and exciting (?) add-ins but once you have done a few campaigns with MailChimp you will have a better idea of what you need and what you want. MailChimp can be upgraded, as well there are lots of other MailChimp plugins for WordPress with many other options to make your campaign a success!
I hope this has been as educational for you as it has been for me. If you see any errors or omissions, please contact me at support@fearlessaffiliate.com. If you like this article, consider sharing it with others and please leave comments in the box below. We will never share your information!!
Happy Blogging!
-Irma 🙂
Hi, Irma, once again a very informative post. I still haven’t found time to start my email campaign but keep thinking of ways to make it attractive. I think with MailChimp and Google alert I will have all I need to create an interesting news letter.
Thanks for the update
Hi Stefan and thank you for stopping by today!
I think that if you can post about once a month in the beginning, just to get the ball rolling, that will help and will not be intrusive to your subscribers. Best of luck with your email campaign!
Cheers,
Irma 🙂
Great post, very information well detailed with a ton of good information. Your readers will love what you are sharing.
Thank you Norman! I hope that this information is useful and can help some people new to blogging.
Cheers,
Irma 🙂
Great information Irma! I’m working, slowly, toward utilizing your hard efforts to get these instructions out to those of us who haven’t gotten to this part until now! Setting up the email stuff is starting to come to the forefront of my things to do. I previously used a subscribe plug in that didn’t quite work out. Definitely going to reach deeper into the mailchimp and other programs you’ve suggested. Thanks for sharing.
Thank you for visiting today Paula!
I sincerely hope that these posts are helpful for you in setting up your email. It is great to be able to stay in touch with people who visit our sites!
Cheers,
Irma 🙂
Thank you for the detail step by step process on MailChimp. I like MailChimp because as you said, it is free! It’s free but just as good as other email marketing tools like Awaber and Getresponse. Another good thing about MailChimp is that Shopify loves MailChimp! So it helps us expand our business even to e-commerce.
Hello Kyoko and thank you for stopping by today!
I am glad that you are enjoying MailChimp. I think it is an easy to learn program, after the initial set-up is complete. I am glad that it works well with Shopify because so many of us are going that way now!
Cheers,
Irma 🙂
Hey, I like it and very informative and on a real personal level, nice to see a bit of humour in the text as something like this could get a bit dry, boring and monotonous.
Hi Geoff and thank you for stopping by today!
It is a fine line with me and humor…I have learned the hard way that not everyone understands my personal level of sarcasm lol, so I try to keep it minimal.
Cheers,
Irma 🙂
I will definitely be using your advice in this series to get my email list going for my online business. Thank you!
Hello Celeste, and thank you for dropping by!
I am glad to have been of service with this series. I was intimidated when I first looked at MailChimp, but now we are old friends. I am going to look at all the things that MC can do, and update the series as necessary.
Cheers,
Irma 🙂